|
How do I make a checklist
for my students?
First, choose the type
of project. Currently, we offer checklists for written reports,
science projects, multimedia projects, and oral presentations. We
also offer all these same checklists in Spanish, should your students
require this.
For example, I'll choose
writing, K-1, because my kindergartners are going to write some
sentences about the class pet to put in a classroom journal. I'll
click on K-1 under writing.
That takes me to a page like this:
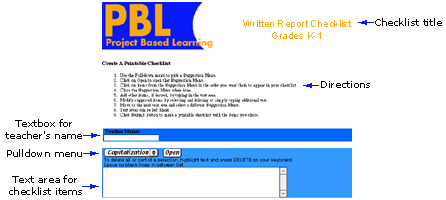
On this page, you see
the title of the checklist you have chosen, the directions, and
numerous white textboxes surrounded in blue. There is one small
textbox for the teacher's name. There are also numerous large
textboxes (only one is shown here), one for each category in the
checklist.
To create a printable
checklist, the second step is to fill these textboxes with the criteria
for which your students are responsible. Always start with the first
text box. Do not start at a box in the middle of the page.
To fill in the first textbox, click on the pulldown menu and choose
the category you wish to use. I'll choose Capitalization.
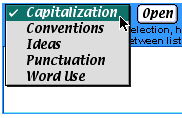
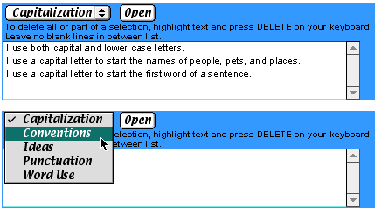
When you have chosen
a category, click open and a Selection Menu with suggested
criteria will appear in a new window. The Selection Menu looks like
this.
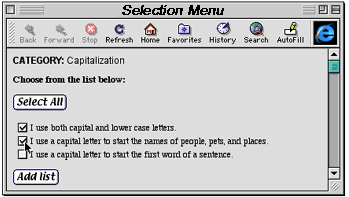
In the Selection Menu,
check the items in the order you want them to appear in the checklist.
Once you're done with these, click the Add list button.
If
you don't click the Add list button, the category items will not
be added.
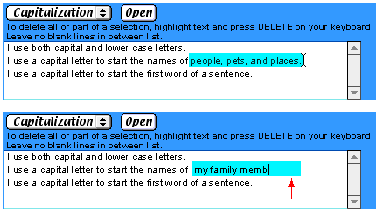
At this time, all of
the checked criteria will appear in the textbox in the original
window. To add your own criteria, simply click inside the textbox
and type them in. You don't need to skip lines.
You can also edit the
criteria to meet your own needs. View the image below. You can highlight
text and replace it with your own edits (see the red arrow).
Once you have added and
edited all the criteria in the first category, go to the next category
by choosing it from the pulldown menu in the next blue section.
You can see this in the image below.
Complete categories and
criteria in this way until you are finished. When you have added
all the criteria your students need, click the Create printable
checklist button, which you see below.

Once you
have clicked this button, your checklist will be made, and you will
be given the URL of the checklist. Bookmark this URL before you
print, in case you want to use the same checklist again.
How do I deselect or
delete a criterion that I've accidentally selected in the Selection
Menu?
If the Selection Menu
is still open, simply click on the already-checkmarked box and the
checkmark will disappear. If you have closed the Selection Menu
and the unwanted criterion is in the textbook, highlight the unwanted
criterion and click the delete button on your keyboard.
How do I add my own
criteria?
Click inside the textbox
and type your own criteria. Be sure to press return after each new
criteria, but don't skip lines between items in the list.
Do I have to use every
category?
No. If you do not use
a category, it will not appear on the checklist.
|